Caramac cupcakes

I love to create my own recipes and write them up on here (it’s the only way I can ever keep track of what I’ve put into a recipe!), but sometimes I give other people’s recipes a go to try them out. This is one of those times!

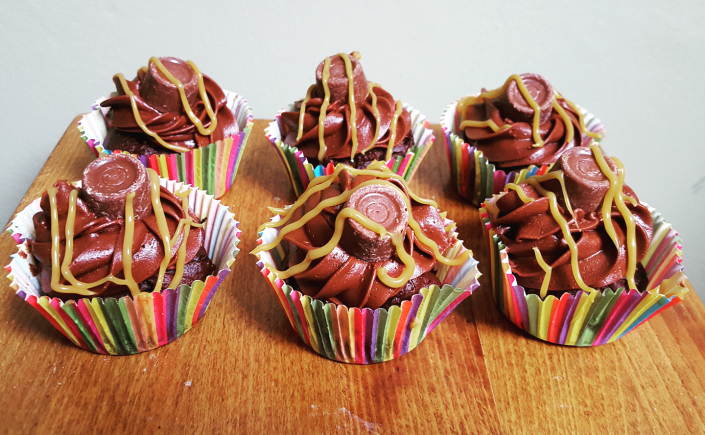
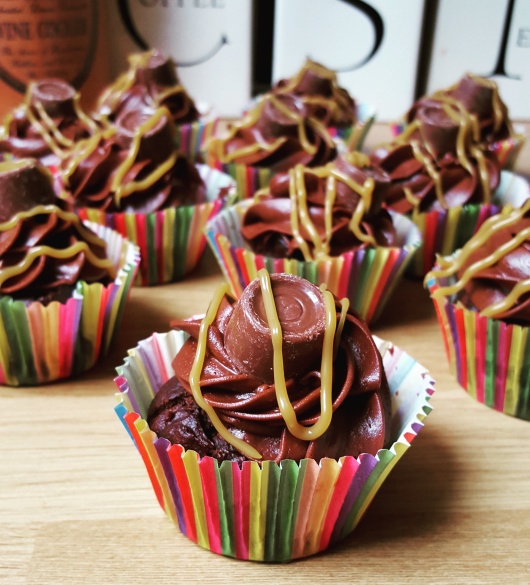
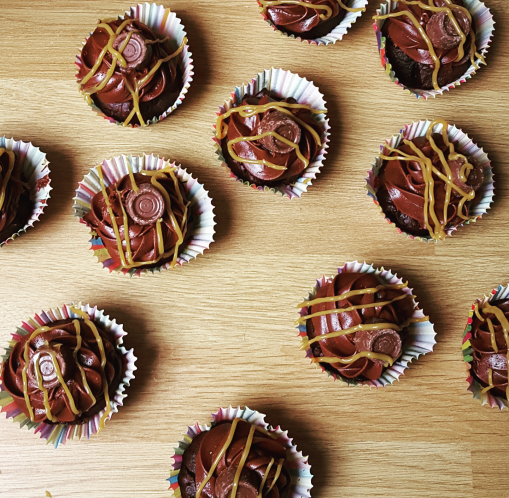
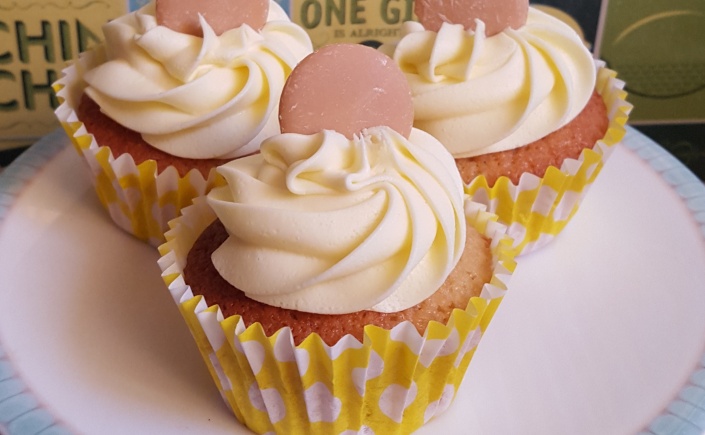
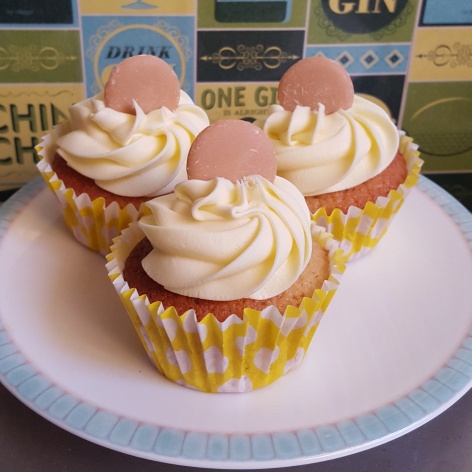
This recipe for Caramac cupcakes is courtesy of the lovely Jane at Jane’s Patisserie, and boy do they taste as good as they look. I’m a big Caramac fan and practically grew up on the stuff, so when I saw this I knew I’d have to give it a try.

wp-1455537686696.jpg

Ingredients

150g unsalted butter. 150g light brown sugar. 3 eggs, beaten. 150g self raising flour. 2 tbsp whole milk

Frosting and decoration:

125g unsalted butter. 250g icing sugar. 150g Caramac, chopped. 2 tbsp whole milk. Caramac buttons.

Method

  1. Preheat oven to 170C  and line a 12 hole cupcake tray with large cupcake cases.
  2. Cream together the butter and light brown sugar till smooth. Add in the beaten eggs and flour and beat again for about about 20-30 seconds. Once combined it might still be a little stiff, so loosen with the whole milk.
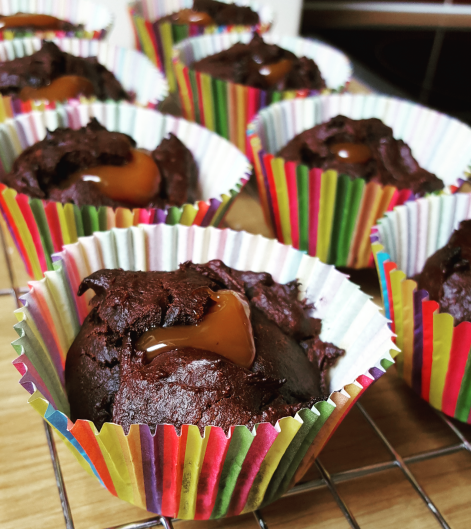
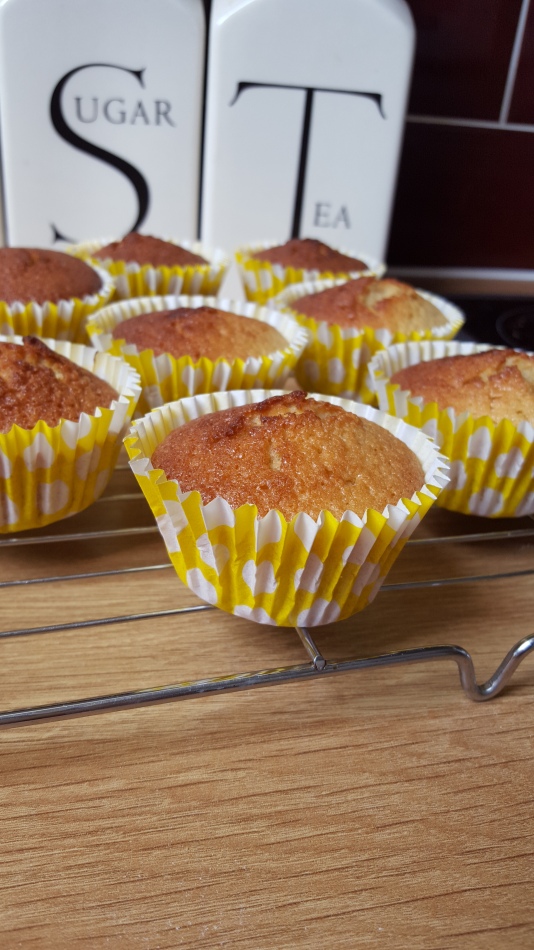
  3. Spoon the batter into the cases and bake in the oven for 20 minutes or until cooked through. Leave to cool on a wire rack.

    wp-1455538518171.jpg

  4. Once the cakes are cool, make the frosting. Add the Caramac to a heatproof bowl and melt in the microwave on short bursts until melted and smooth.
  5. Beat the softened butter until smooth – this can take a couple of minutes. Add in the icing Sugar 1/3 at a time, making sure the sugar is fully incorporated until moving on!
  6. Once all of the icing sugar is in the frosting mix, add the melted Caramac to the mixture and beat again till smooth – keep on beating the frosting and add the milk 1 tbsp at a time till you reach your desired consistency.
  7. Decorate your cupcakes using the Caramac buttons and enjoy!


Rolo cupcakes (with a surprise salted caramel centre!)

Well guys, it’s that time of year again. Sports Relief do the Great British Bake Off!

In true celebratory style, I’m getting together with some friends tomorrow night to celebrate. Our tradition is for us all to bake something from last week’s episode, but, as this is the first episode, it’s anything goes.

With that in mind, I was eating a packet of Rolos at work, when inspiration struck… Rolo cupcakes! This is my standard go to recipe for chocolate fudge cupcakes, filled with salted caramel, topped with chocolate frosting, a Rolo and more salted caramel!

If you try them out, be sure to let me know your thoughts…

wp-1453839588405.jpg

Ingredients

200ml water. 85g butter. 85g caster sugar. 1 tbsp golden syrup. 3 tbsp milk. 1 tsp vanilla extract. 1 tsp bicarb soda. 225g plain flour. 2 tbsp cocoa powder.

For the frosting

230g butter. 60g cocoa powder. 85g melted plain chocolate. 2 tbsp double cream. 450g icing sugar. 16 Rolos.

For the salted caramel sauce

200g granulated sugar. 90g butter. 120ml whipping cream. 1 tsp salt.

wp-1453818319816.png

Method

  1. Preheat the oven to 180C. Line a cupcake tray with 16 cases.
  2. Place the water, butter, sugar and syrup in a large saucepan and heat gently, stirring until the sugar has dissolved. Bring to the boil, reduce the heat and cook gently for 5 minutes. Leave to cool.
  3. Place the milk and vanilla extract in a small bowl. Add the bicarb soda and stir to dissolve.
  4. Sift the the flour and cocoa powder into a separate, large bowl, then add the cooled, syrup mixture. Stir in the milk mixture and beat until smooth, then spoon this into the paper cases.
  5. Place in the oven for 20 minutes, or until cooked through.
  6. Whilst they’re in the oven, you can make the frosting! Start by beating the butter until light and fluffy. Add in the cocoa, beating until combined. Add the melted and cooled chocolate to the mixture, then add in the double cream. Beat in the icing sugar gradually, otherwise it gets a bit messy, until combined.

    wp-1453818395817.png

  7. This brings us to the salted caramel sauce. Heat the granulated sugar in a medium saucepan over medium heat, stirring constantly with a high heat resistant rubber spatula or wooden spoon. Sugar will form clumps and eventually melt into a thick brown, amber-colored liquid as you continue to stir. Be careful not to burn.
  8. Once sugar is completely melted, immediately add the butter. Be careful in this step because the caramel will bubble rapidly when the butter is added. Stir the butter into the caramel until it is completely melted, about 2-3 minutes.
  9. Very slowly, drizzle in the whipping cream while stirring. Since the cream is colder than the caramel, the mixture will rapidly bubble and/or splatter when added. Allow the mixture to boil for 1 minute. It will rise in the pan as it boils. Remove from heat and stir in 1 teaspoon of salt. Allow to cool down before using.
  10. Using a piping bag, pipe a large teaspoon full of salted caramel sauce into each cupcake. It’s best to do this when the cupcakes are still warm, but not too hot.
  11. Once the cupcakes have cooled completely, place the frosting into a piping bag and pipe generously over the cooled cupcakes.
  12. Place a Rolo on top of each cake and drizzle the rest of the salted caramel sauce over them.

Voila!

wp-1453839588409.png

Ginger pannacotta with raspberries and lemon shortbread

The first dinner party of 2016 called for something special for dessert. I was under strict instructions not to bake anything to heavy, as the starter and main course were both quite full-on. I decided to go for a light, fresh and fruity pannacotta!

I’m a big pannacotta fan, but I had never previously made it myself before. This was all a bit of an experiment for me, which of course went slightly wrong, but was saved by some quick thinking. I tried to remove the pannacotta from the ramekins before serving, which made them look like slop, and they quickly went back into the ramekins to serve!

I’ve increased both the ginger and lemon quantities from my original recipe, as I like a lot of flavour, but if you prefer something more subtle, just half the amounts of ginger and lemon zest.


Ingredients
600ml single cream. 100ml milk. 115g caster sugar. 2 tbsp finely gated fresh ginger. 3 tsp gelatine powder. Handful of raspberries.
For the shortbread
228g plain flour. 2 tbsp icing sugar. 90g butter. 2 tbsp finely grated lemon zest. 1 tbsp lemon juice.
Method

  1. Combine cream, milk, sugar and ginger in a medium saucepan. Stir over low heat until sugar has dissolved, then increase heat slightly until just boiling. Turn off heat and stand for 15 mins. Strain through a fine sieve into a jug.
  2. Place 2 tbsp of cold water in a small bowl, and sprinkle gelatine over. Leave to soften, then stand the bowl in a shallow pan of hot water, or heat in the microwave, and whisk with a fork until the gelatine has dissolved. Whisk into cream mixture. Lightly oil 6  ramekins. Pour the cream mixture into the moulds, and place into the fridge for 4 hours, to set.
  3. For the shortbread, preheat oven to 150C. Place flour, icing sugar and butter into a food processor. Using the pulse button, process in short bursts until mixture resembles breadcrumbs. Add zest and juice and process again in short bursts, until the mixture just starts to clump together.
  4. Turn out onto a sheet of baking paper, and roll out to 7mm thick. Using a 5cm cutter, cut shapes from the dough (you should get about 18). Place on the baking paper on a baking tray, and cook for 12 mins, until golden underneath. Transfer to a wire rack to cool completely.
  5. Serve in ramekins on a dish with the shortbread and raspberries scattered on top.

wp-1452273320114.png

Boozy gin soaked inside out trifle cake

Now that the manic Christmas period is coming to an end, I finally have a chance to post a festive recipe or two!

As is tradition with my family, I was in charge of desserts for Christmas Day, and I kicked it off with this Christmassy delight – a twist on the traditional trifle. I’ll be honest, I’m not usually a fan of trifle, but this one works for me. It’s a cake, with a hollowed out centre which is filled with the standard fruit, custard and cream, then decorated with pistachio brittle and pomegranate seeds. It’s one of my personal favourites and I hope you like it just as much as I do 🙂
wp-1451484137589.jpg

Ingredients

For the syllabub:
40g caster sugar. 60ml gin. 1 tbsp brandy. Finely grated zest and juice of 1 lemon. 300ml whipping cream.

For the sponge:
250g unsalted butter, softened, plus extra for greasing. 220g caster sugar. 1 tsp vanilla extract. 4 large free-range eggs. 300g self-raising flour. 50ml whole milk. 30ml flavoured gn (I went for cranberry!). Large handful of raspberries.

For the custard:
280ml whole milk. 280ml double cream. 50g unsalted butter. 35g cornflour. 5 large free-range egg yolks. 100g caster sugar. 1 tsp vanilla extract.

To decorate:
75g nibbed pistachios. 100g caster sugar. Pomegranate seeds.

Method

  1. For the syllabub, put everything except the cream in a large mixing bowl to infuse for a few hours.
  2. Preheat the oven to 170C. Line a greased 20cm loose-bottom deep cake tin with baking paper.
  3. For the sponge, beat the butter, sugar and vanilla in a mixing bowl until light and fluffy. Beat in the eggs, one at a time, adding some of the flour if it looks like it might curdle. Beat in the milk and gin until smooth. Stir in the remaining flour until the mixture is smooth and well combined. Spoon into the prepared tin and level the surface.
  4. Bake for an hour and cool in the tin for about 20 minutes, then turn out and cool completely on a wire rack.
  5. Meanwhile make the custard. Put the milk, cream and butter in a pan and, as it comes to the boil, remove from the heat. In a small bowl, mix a little of the hot milk mixture into the cornflour. Whisk the egg yolks with the sugar and vanilla in a large bowl until combined. Whisk the cornflour mixture into the rest of the hot milk, then pour over the egg mixture and stir to combine.Tip into a clean pan and cook over a low heat, stirring all the time, for about 5 minutes until it thickens to a dropping consistency. Pour into a bowl and whisk until cooled slightly. Leave to cool completely with a piece of cling film touching the surface to prevent a skin forming.
  6. Put a saucer on top of the sponge, in the centre, and cut around it with a small sharp knife to a depth of 4cm. To hollow out the sponge, make a series of cuts 4cm deep inside the circle to create 2.5cm squares, then use a small spoon to scoop it out in blocks. Drizzle the hollowed-out sponge generously with gin. Scatter the raspberries over the hollow, then pour over the custard. Chill for at least an hour to set the custard.
  7. To decorate, scatter the pistachios over a baking tray lined with baking paper. Melt the caster sugar in a frying pan over a low heat without stirring until it forms a golden caramel, then pour onto the pistachios, tipping the tray to coat evenly. Leave to cool completely, then tip out the caramel and carefully break it into shards with the point of a heavy knife.
  8. To finish the syllabub, pour the cream onto the boozy lemon and sugar mixture and whisk with a balloon whisk until the cream is billowy and holds its shape. Spoon it over the filled sponge, scatter over pomegranate seeds, then decorate with shards of pistachio brittle. Serve immediately. The cake will keep for up to 2 days in the fridge.

wp-1451483456198.jpg

Clementine and poppy seed cake

We had an end of term party at college a couple of weeks ago, and having told everyone else that I adore baking, they asked me to bake something festive as my contribution!

With it only being early December at the time, I didn’t want to go for anything too full-on and Christmassy, so I decided to bake this gorgeous clementine and poppy seed cake.

It went down a treat at college, as did the leftovers at work too! It’s very moist and does have that distinct orange taste. It’s almost like a classic lemon drizzle cake, with a festive twist.

Ingredients

140g butter, plus extra for greasing. 50g crème fraîche. 200g golden caster sugar. 1 tsp vanilla extract (or orange extract if you have any). 3 large eggs. 225g self-raising flour. 50g cornflour. 2 tbsp poppy seeds. 4 clementines, zest from 3 and 100ml juice.

For the icing:

70g unsalted butter. 200g icing sugar. 70g crème fraîche. Zest 1 clementine. 1 tbsp chopped clementine peel.

Method

  1. Heat oven to 160C and grease a  loaf tin. Line the base and ends with a long strip of baking parchment.
  2. Beat the butter, crème fraîche, sugar and vanilla extract until pale and fluffy. Whisk in the eggs, one by one, followed by the flours, poppy seeds, zest and juice. Scrape into the prepared tin and bake on a middle shelf for 1 hr–1 hr 10 mins until a skewer poked into the centre comes out clean. Cool the cake for 20 mins in the tin, then carefully tip out and cool completely on a wire rack.wp-1450629990977.jpg
  3. Meanwhile, make the icing – beat together the butter, icing sugar and crème fraîche until pale and fluffy. Add half the clementine zest and beat just a couple of times to incorporate, then cover and leave in the fridge to chill until the cake is ready to ice and the icing is firm enough to spread or pipe.
  4. Spread the icing all over the cake or put in a food bag or piping bag, snip off the corner and pipe thick stripes over the top. Sprinkle with the remaining clementine zest and the candied peel.

wp-1450629990976.png

Chilli, pesto and parmesan shortbread

As much as I love baking sweet cupcakes, chocolate cakes and iced buns, sometimes I just crave something a tad more savoury. That’s where these delicious shortbread biscuits come in.

The chilli kick after the initial cheesy, pesto taste is glorious. I’m not a fan of really hot, spicy foods, so feel free to up the chilli levels when you make them if you can handle the heat!

Shortbread

Ingredients

255g plain flour. 75g parmesan cheese. 55g pesto (I chose green, but red works just as well). 1 tsp salt. 1/2 tsp hot chilli powder. 1/2 tsp mild chilli powder. 22og unsalted butter.

Method

  1. Preheat the oven to 180 C and line a couple of trays with baking paper.
  2. Place the flour, parmesan, pesto, salt, chilli and butter into a food processor. Pulse the machine on and off until a dough forms. Gather the dough together and give it a light knead.
  3. Scoop rounded teaspoons of the dough and roll them into balls. Place them on the baking trays and press them down into 2 inch diameter rounds. Bake for 20 minutes, until golden.

wp-1449426655639.jpg

Chocolate Kitkat cupcakes

I’ve been a busy little baking bee recently, however I haven’t had much time to put all the recipes on here, so I’ve got some catching up to do!

This wad a quick bake last weekend, when I had an hour free before going over to a friend’s house for the afternoon. They’re simple chocolate cupcakes, with chocolate buttercream frosting, topped with delicious Kitkats – one of my personal favourites.


Ingredients

100g plain flour. 20g cocoa powder. 140g caster sugar. 1 1/2 tsp baking powder. Pinch of salt. 40g unsalted butter. 120ml whole milk. 1 egg. 1/4 tsp vanilla extract.

For the frosting:

230g butter. 60g cocoa powder. 85g melted plain chocolate. 2 tbsp double cream. 450g icing sugar. 8 Kitkats.

Method

  1. Preheat the oven to 170C.
  2. Put the flour, cocoa powder, sugar, baking powder, salt and butter in a free standing electric mixer with paddle attachment and beat on a slow speed until you get a sandy consistency and everything is combined.
  3. Whisk the milk, egg and vanilla extract together in a jug, then slowly pour about half into the flour mixture. Beat to combine and turn the mixer up to high speed.Continue mixing for a couple more minutes until the mixture is smooth. Be careful not to overmix!
  4. Spoon the mixture into the paper cases until two-thirds full and bake in a preheated oven for 20-25 minutes. Leave the cupcakes to cool slightly in the tray before turning out onto a wire cooling rack to cool completely.
  5. For the frosting, beat the butter until light and fluffy. Add in the cocoa, beating until combined.
  6. Add the melted and cooled chocolate to the mixture, then add in the double cream.
  7. Beat in the icing sugar gradually, otherwise it gets a bit messy, until combined.
  8. Place frosting into a piping bag and pipe generously over the cooled cupcakes. Add the Kitkats to the top to decorate!

wp-1448823001909.jpg

Chocolate and red wine cake

We celebrated my Dad’s birthday this weekend with visit to the BBC Good Food Show! My personal highlight was seeing the delightful Mary Berry, who is even tinier in real life than she looks on the Great British Bake Off, and of course Paul Hollywood, who is exactly as you would expect!

I baked this chocolate and red wine cake in celebration, as my Dad is a big wine drinker, and I have to say it did actually taste very alcoholic. I’m not too sure that all the wine cooked off in the oven, but never mind!

wp-1448822913562.png

We enjoyed it with some delicious clotted cream, which I can’t recommend enough.

12276996_988697397857238_509780128_n

Ingredients

210g plain flour. 75g cocoa powder. 1 tsp bicarbonate of soda. 1/2 tsp salt. 1/2 tsp ground cinnamon. 230g butter, softened. 250g caster sugar. 100g light brown sugar. 2 large eggs. 2 tsp vanilla extract. 300 ml red wine.

For the ganache:

100g dark chocolate, chopped into small pieces. 150g double cream.

Method

  1. Preheat oven to 180C degrees. Grease a bundt pan and set aside.
  2. In a medium bowl sift flour, cocoa powder, bicarbomate of soda, salt, and cinnamon. Set aside.
  3. In a large bowl beat together butter and sugar until light and fluffy. Beat in the eggs one at a time until combined. Beat in vanilla extract.
  4. Fold in the flour mixture in 3 additions, alternating it with the wine in 2 additions (starting and ending with the flour). Be careful not to overmix!
  5. Scrape the batter into the prepared pan and smooth the top. Bake for 50 minutes. Allow the cake to cool in the pan for 10 minutes on a wire rack, then turn it out and let it cool completely.
  6. Place the chocolate in a medium bowl. Heat the double cream in a saucepan until it just boils. Pour the cream over the chocolate and stir until melted. Once it reaches a pouring consistency, pour over the cake to decorate.

11939657_178546452493625_1034791932_n(1)

Spinach and cheese muffins

It’s not very often I bake savoury things, but I make an exception for these muffins. They’re often a typical Sunday afternoon bake in our house as they’re perfect to then take in to work for a lunchtime snack!

wpid-wp-1447093409435.png

Ingredients

1 tbsp vegetable oil. 200g baby leaf spinach. 250g plain flour. ½ tsp coarse sea salt. 2 tsp baking powder. ½ tsp bicarbonate of soda. 80g cheddar, coarsely grated. 2 medium eggs, beaten. 75g unsalted butter, melted. 250ml buttermilk.

Method

  1. Preheat the oven to 200°C. Line a 12-hole muffin tin with muffin cases.
  2. Wilt the spinach by putting it in a colander in the sink and pouring over boiling water from a kettle. Refresh under cold water, then use your hands to squeeze out as much liquid as you can. Transfer to a chopping board and chop finely.
  3. Combine the flour, salt, baking powder, bicarbonate of soda and most of the cheese in a large bowl. In a separate bowl or large jug, mix the beaten eggs, melted butter and buttermilk. Pour the egg mixture over the dry ingredients and stir, using a spatula, until just combined. Fold in the cooled bacon, chopped spinach and chives until everything is evenly distributed but the batter is still lumpy.
  4. Spoon the batter equally among the cases, scatter over the remaining cheese, then bake for 18-20 minutes until golden and risen. Remove the muffins from the tin and place on a cooling rack until ready to serve.

wpid-wp-1447093409433.png

Halloween zombie chocolate cake

I’m flying to Madrid tomorrow for a long Halloween weekend (just thought I’d drop that in!), so this year I’m not going to be baking any Halloween-themed goodies. However, last Halloween I contributed to a bake-off at work with my zombie chocolate cake!

It’s incredbly easy to make, yet very effective. I used my basic chocolate cake recipe, added Oreo crumbs to the top for soil, then marzipan fingers, and I was done!

wpid-wp-1446116578422.jpg

Ingredients

3 large eggs. 175g self-raising flour. 175g caster sugar. 175g softened butter. 1½ tsp baking powder. 40g cocoa powder. 4 tbsp boiling water.

For the topping

150ml double cream. 150g plain chocolate, broken into pieces. 4 tbsp apricot jam. 200g Oreos. 200 marzipan.

Method

  1. Preheat the oven to 180C.
  2. Beat together the eggs, flour, caster sugar, butter and baking powder until smooth in a large mixing bowl.
  3. Put the cocoa in separate mixing bowl, and add the water a little at a time to make a stiff paste. Add to the cake mixture.
  4. Turn into the prepared tins, level the top and bake in the preheated oven for about 20-25 mins, or until shrinking away from the sides of the tin and springy to the touch.
  5. Leave to cool in the tin, then turn on to a wire rack to become completely cold before icing.
  6. To make the icing: measure the cream and chocolate into a bowl and carefully melt over a pan of hot water over a low heat. Stir until melted, then set aside to cool a little and to thicken up.
  7. To ice the cake: spread the apricot jam on the top of each cake. Spread half of the ganache icing on the top of the jam on one of the cakes, then lay the other cake on top, sandwiching them together. Use the remaining ganache icing to ice the top of the cake.
  8. Separate the Oreos into biscuit and filling. Eat the filling (this isn’t needed for the cake, so you might as well). Place the Oreos biscuits into a plastic bag and bash with a rolling pin to break into crumbs. Sprinkle the crumbs on top of the ganache topping.
  9. Roll out the marzipan into this sausages. Cut into 5 finger shapes, of approx 5-6cm length. Use a toothpick to create knuckles and nails, and bend into shape. Place a toothpick into the end of each finger to attach it to the cake in a zombie hand shape.

Enjoy and happy Halloween 🙂

wpid-wp-1446116578417.png